Wednesday, July 29, 2015

Forgesworn Eternals - Lord-Celestant on Dire Bear (Work In Progress)

So this guy is coming along. The bear head position is finalized and the great greenstuffing fur project has begun. This is a long process because I sculpt a patch of fur, then I need to let it set before I can move onto another patch. Sure I can be doing other patches on other parts, but even then I am having to wait several hours for soft areas to harden before I can continue the fur in that area. This is mainly because the way I hold the mini I don't want my fingers resting on soft spots while I sculpt new areas.

Anyway I am super stoked how this guys will turn out. I have found the name for him too: Storbjorn. Which according to google translate, it's Norwegian for 'big bear' kinda. Close enough for me.

stormcast eternals conversion
age of sigmar conversion
lord-celestant conversion

Monday, July 27, 2015

Forgesworn Eternals - Lord-Celestant on Dire Bear

I had to do this post because I finally found it! The perfect bear head for my Lord-Celestant conversion.
Just try to cut out with your minds the main body and legs of the metal bear behind the Dracoth torso from the Lord-Celestant on Dracoth mount.

The plan right now is to cut off that head from this perfectly good metal mini [cries internally], somehow get it to mount solidly in the hollow body, green stuff the gaps by making fur, and green stuff fur allover the exposed scaly skin of the dracoth to make it into a true dire bear.

I had first purchased this mini from reaper. The neck was the right size, but it was still too small. The muzzle would have looked really small compared to the body. So I went to a couple toy stores, hoping some plastic toy bears could work. They didn't. Too many were portrayed as docile creatures and not befitting the dire bear. Finally I took a plunge and bought this guy. It was a risk because if it wouldn't work, that would be $20 down the drain.

I am glad to say I am pretty confident with this one. Now to get some heavy convertin' goin' on.

stormcast eternals conversion
age of sigmar conversion
lord-celestant conversion

Friday, July 24, 2015

Forgesworn Eternals - Liberator test painted

Here he is all painted up. This is the Liberator test model for my Forgesworn Eternals. I'm pretty pleased with the paint scheme and how this turned out.

I hope the shield design turned out well enough, it's supposed to be the Ghal Maraz in front of a silver mountain range. And the ribbon is supposed to say 'GRUNGNI' and 'SIGMAR' in the traditional ancient dwarf script of the old world, klinkarhun.
As you can see the shoulder's symbol is the 'L' in klinkarhun, for Liberator.

Now that this sets the theme of my army, here is a sneak peak of what I am working on next:
liberator conversion
stormcast eternals conversion
age of sigmar conversion
lord-celestant conversion

Friday, July 17, 2015

Forgesworn Eternals - Liberator test model

I have a few of the Stormcast Eternal models from the Age of Sigmar box set. I have a theme in mind for my own Stormhost.

In our Konomancer setting, there exists a human nation that have sworn their allegiance to the Dwarf kingdoms. This was because of some favor performed so long ago. This nation was known as the Forgesworn.

I plan to recreate them in some way for my Age of Sigmar army. So I thought of a stormhost made specifically by Grungni himself. Made with the sole purpose of protecting and reclaiming the duarden holds and lands. They are the:

Forgesworn Eternals

This is the free model that came with White Dwarf 75. The conversions are simple. Mainly I put him on a 32mm base instead of the 40mm he comes with. In a game where bases don't matter, you don't want them getting in the way. The head is from the Irondrakes kit. I scraped off the lightning bolts that emanate from the hammer on the shield. I have painting plans there. Also the runes on the ribbons are filled in with liquid greenstuff so I can draw dwarf runes over top of them, to show they were endowed by Grungni himself.

I will get more lore written out for these guys as I get more of the models done. Just wait until you see what plans I have for the Lord-Celestant.

liberator conversion
stormcast eternals conversion
age of sigmar conversion

Wednesday, July 8, 2015

Warhammer: Age of Sigmar. My review.

I will start this review by saying that I have played Warhammer Fantasy Battles, 8th edition. So some backstory incoming. I didn't play it much, but I have. I started a small Dwarf army several years ago because I am a big fan of Dwarfs and their fluff in Warhammer. However quickly realizing the sizeable force I would need for a game and lack of fantasy players in my area, my Dwarf army never grew beyond a side project. Which I thought was a shame because I really liked my Engineer's Guild themed conversions.

Fast forward to several years later and my 40k gaming partner and I started expressing an interest in giving WHFB 8e a go. He bought and built up a Warriors of Chaos force and I expanded on my Dwarfs. We then played maybe 2 games of 8th edition. We found it... ok. I think we were able to pick it up because we were both experienced 40k players, but it was different enough. However we soon went back to 40k and put our collections away.

Fast forward to last week, and Age of Sigmar rumors were starting to leak and filter in en masse. At first many were thinking it was just going to be 9th edition. Which didn't get me excited. I would be giving it a shot just so my Dwarfs could see the game board again, but nothing excited me. Then the rumors started piling in on what this new game, Age of Sigmar, actually is.

This is something that genuinely excited me. I always wanted to get into a skirmish scale game for Warhammer fantasy, and this seemed to be it. The fact that the core rules fit in 4 pages attributed to the possibility of a fast paced skirmish fantasy game like I hoped it would be. The warscrolls were inspiring, joke rules aside (which I see as the final farewell to the old armies they were meant to be, and the designers' own sense of humor).

Right off the bat, I could see other's reviews and playtests of it. The glaring issue was coming up with balanced forces for both sides. So in our first game, I thought of an idea for balancing forces.
  • 50 wounds to each side.
  • Up to 50% of your wounds may be allocated to warscrolls with the Hero keyword.
  • A minimum of 25% of the wounds must be allocated to Core units as labeled in their last army book.
  • A maximum of 50% of the wounds may be allocated to Special units as labeled in their last army book.
  • A maximum of 25% of the wounds may be allocated to Rare units as labeled in their last army book.
I wanted to start with limiting wounds because I felt it was a better solution than limiting models. And going with 8th edition style army list composition prevents spamming and taking nothing but powerful units. Others are developing systems for calculating points costs and I may try that at a later date.
I know it wasn't required to rebase my stuff, but I'm really liking round bases. My Dwarfs look great on them.
So my gaming buddy and I built our lists and give the game a go. We wanted to keep the rules as-is for our first game, and decide if we wanted to houserule anything wonky later.

The game went great! I really enjoyed how easy it was to pick up and get used to. Combat goes by much faster with standardized to-hit and to-wound rolling. Some say that has become boring, but when you memorize your warscrolls it goes by so quick you don't even notice. And when you get heroes involved in things, they add some more complexity to it. Even the rules that seemed like they would be weird or distracting didn't come into play at all. I felt our forces were pretty evenly matched. He had a lower model count so he got a Sudden Death objective, which almost cost me the game, but when we got into combat with some of our units we realized the advantage of having a higher model count still, so I think the sudden death objective helped to even thigns out. I just got lucky in surviving it and the battle turned in my favor.

I really look forward to playing more games in the future.  My brother Jarom got the Orcs and Goblins Warscoll Compendium so I hope to catch a game with him on a later date.

On a final note, Dwarfs are just as good at dispelling magic as ever. As soon as my Runelord got in range of his Chaos Sorcerer, he couldn't even get a spell in edgewise.

Wednesday, June 10, 2015

XV86 Response Suit (How I did it - Part 2)

This is the second and final part of the XV86 Response Suit conversion.

First we take the torso you made in part 1.
We are going to mount on the thruster assemblies you cut off in the previous part, but in a different way. This creates a more dynamic thruster array that looks like the vents are actually point down. Be sure to attach the small bit to complete the bottom vent on the thrusters. Make sure they attach to the intakes as pictured.
I apologize if these parts seem to be assembled in a slightly random order. This is just how I built them. Now built the pelvis from the broadside kit as normal. The broadside legs and pelvis are pretty good for basic suit conversions like this, if you don't want to make your own salvaged from the crisis torso like I did with the XV9s.
Now we will be using the broadside legs.
Our goal is to thin it down because we won't be using the thigh guards on the legs. Those are reserved for another part. Shave off the little nubs that the thigh guards attach to.
Now remove the calf servos as pictured and cut them down to this. Broadside legs look pretty huge on a basic Crisis torso, so doing these steps will bring them more in line with the size the Crisis suit is. With a little shaving off, the ankles on these legs fit in the basic Crisis feet. The XV88 feet look a little big. They work for the XV9 because technically that suit is supposed to be a bigger size class. But for the XV8 their original feet work fine.
Back to our torso we built earlier, we are going to modify it more. Here we are going to cut off the part of thruster assemblies that stick above the level of the intakes.
Now prepare some aerials from some other kits. These come from the Broadside kits, but even some of the extras from the Riptide would work fine. Just try to keep a uniform design among the same team of suits. These are to be the many little wings and rudders that help steer the fast and complex flight system of the XV86.
I may have skipped a few photos here, and I appologize. But here I cut out some plasticard and covered up the unsightly trenches above the thruster assemblies. Then as you can see, the thigh-guards from the Broadside legs make great coverings for the thruster assemblies. When opened as pictured, it simulates drag like the suit is braking. Opened the other way looks like they are housing another thruster for an extra boost.
I stuck in the servos from the broadside legs so they look like they are the mechanics controlling the covers.
After that the complex parts of the suit are pretty much finished. The rest is up to you. I of course wanted to go for more flightey poses to simulate these things thrusting around allover the battlefield.
Original Crisis suit arms remain the same and the head is up to you. I like these heads from the Broadside kits. They look a little sleeker than the standard Crisis head. I also underslung the guns from the arms rather than mounting them on the side. Everything you can do to make them sleeker looking.
Also the aerials on the sides of the thruster assemblies and above the engine intake in the center can really help sell the 'flying robot' aesthetic I was going for.

Another part I did not cover are the small thrusters on the legs. They follow the same process in my XV9's leg thrusters, and are also made of Space Marine backpack vents.
Closer looks again to the thruster assemblies. On the Full Thrust and Half Thrust modes, there are extra jets hidden beneath the covers. These are cannibalized from Interceptor Drone thrusters. I found them to be the perfect size for this area.

Monday, June 8, 2015

XV86 Response Suit (How I did it - Part 1)

This is a conversion guide for making my XV86 Response Suits. I love converting and kitbashing XV8 suits, so this has a lot of similar steps to my XV9 Hazard Suit conversion I did. Again, these can be used as count-as XV8 Crisis Suits or their own custom rules.
The following kits contributed to this conversion:
For the most part this conversion uses the XV8. The main parts needed from the XV88 is the legs and pelvis assembly, and most bits resellers sell just that together, which is convenient.
Like my last battlesuit conversion, we will start with the torso, namely the back thruster unit.
We will start by removing the thruster assemblies.
We will get back to these bits later.
Next is the middle part of the torso.
We are going to remove the thruster assemblies from this, but leave the vents at the top. A similar cutting is made with the XV9's I did.
Separate the bottom off the piece you just cut out like so.
We will returning to all of these parts.
Finally the front part of the torso.
We start by removing the old pelvis area.
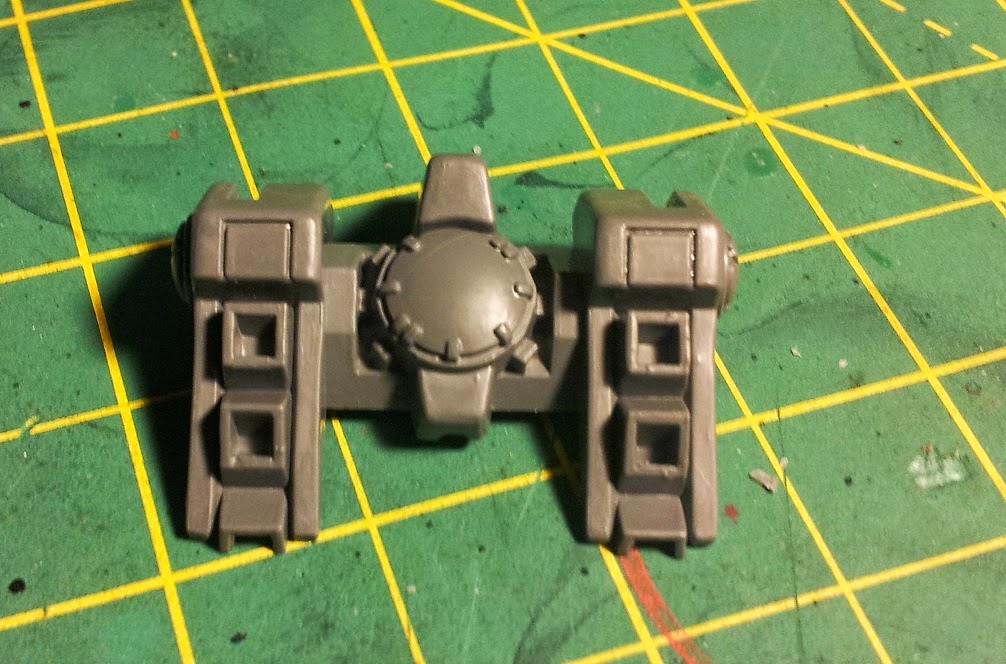
The old pelvis we will not be using in this article unlike with the XV9.
Going back to the central area of the torso, we remove the pelvis parts from that too.
Your center torso piece should look like so.
Now glue together the torso. Again this should be a torso without the thruster assemblies, but the intakes still intact, and the pelvis removed.
More steps to come in part 2.