Wednesday, June 10, 2015

XV86 Response Suit (How I did it - Part 2)

This is the second and final part of the XV86 Response Suit conversion.

First we take the torso you made in part 1.
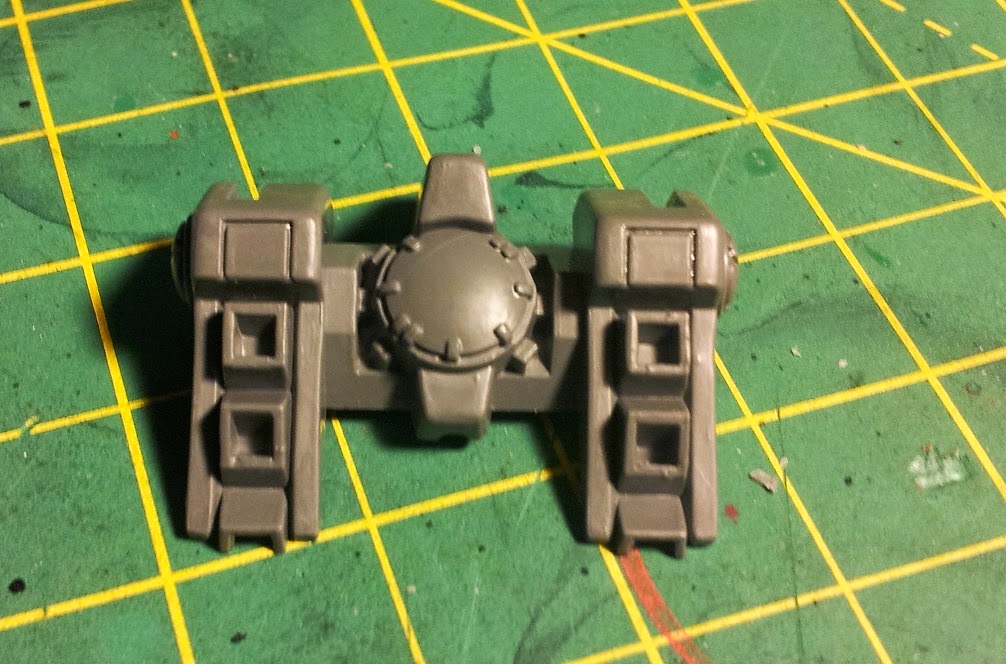
We are going to mount on the thruster assemblies you cut off in the previous part, but in a different way. This creates a more dynamic thruster array that looks like the vents are actually point down. Be sure to attach the small bit to complete the bottom vent on the thrusters. Make sure they attach to the intakes as pictured.
I apologize if these parts seem to be assembled in a slightly random order. This is just how I built them. Now built the pelvis from the broadside kit as normal. The broadside legs and pelvis are pretty good for basic suit conversions like this, if you don't want to make your own salvaged from the crisis torso like I did with the XV9s.
Now we will be using the broadside legs.
Our goal is to thin it down because we won't be using the thigh guards on the legs. Those are reserved for another part. Shave off the little nubs that the thigh guards attach to.
Now remove the calf servos as pictured and cut them down to this. Broadside legs look pretty huge on a basic Crisis torso, so doing these steps will bring them more in line with the size the Crisis suit is. With a little shaving off, the ankles on these legs fit in the basic Crisis feet. The XV88 feet look a little big. They work for the XV9 because technically that suit is supposed to be a bigger size class. But for the XV8 their original feet work fine.
Back to our torso we built earlier, we are going to modify it more. Here we are going to cut off the part of thruster assemblies that stick above the level of the intakes.
Now prepare some aerials from some other kits. These come from the Broadside kits, but even some of the extras from the Riptide would work fine. Just try to keep a uniform design among the same team of suits. These are to be the many little wings and rudders that help steer the fast and complex flight system of the XV86.
I may have skipped a few photos here, and I appologize. But here I cut out some plasticard and covered up the unsightly trenches above the thruster assemblies. Then as you can see, the thigh-guards from the Broadside legs make great coverings for the thruster assemblies. When opened as pictured, it simulates drag like the suit is braking. Opened the other way looks like they are housing another thruster for an extra boost.
I stuck in the servos from the broadside legs so they look like they are the mechanics controlling the covers.
After that the complex parts of the suit are pretty much finished. The rest is up to you. I of course wanted to go for more flightey poses to simulate these things thrusting around allover the battlefield.
Original Crisis suit arms remain the same and the head is up to you. I like these heads from the Broadside kits. They look a little sleeker than the standard Crisis head. I also underslung the guns from the arms rather than mounting them on the side. Everything you can do to make them sleeker looking.
Also the aerials on the sides of the thruster assemblies and above the engine intake in the center can really help sell the 'flying robot' aesthetic I was going for.

Another part I did not cover are the small thrusters on the legs. They follow the same process in my XV9's leg thrusters, and are also made of Space Marine backpack vents.
Closer looks again to the thruster assemblies. On the Full Thrust and Half Thrust modes, there are extra jets hidden beneath the covers. These are cannibalized from Interceptor Drone thrusters. I found them to be the perfect size for this area.

Monday, June 8, 2015

XV86 Response Suit (How I did it - Part 1)

This is a conversion guide for making my XV86 Response Suits. I love converting and kitbashing XV8 suits, so this has a lot of similar steps to my XV9 Hazard Suit conversion I did. Again, these can be used as count-as XV8 Crisis Suits or their own custom rules.
The following kits contributed to this conversion:
For the most part this conversion uses the XV8. The main parts needed from the XV88 is the legs and pelvis assembly, and most bits resellers sell just that together, which is convenient.
Like my last battlesuit conversion, we will start with the torso, namely the back thruster unit.
We will start by removing the thruster assemblies.
We will get back to these bits later.
Next is the middle part of the torso.
We are going to remove the thruster assemblies from this, but leave the vents at the top. A similar cutting is made with the XV9's I did.
Separate the bottom off the piece you just cut out like so.
We will returning to all of these parts.
Finally the front part of the torso.
We start by removing the old pelvis area.
The old pelvis we will not be using in this article unlike with the XV9.
Going back to the central area of the torso, we remove the pelvis parts from that too.
Your center torso piece should look like so.
Now glue together the torso. Again this should be a torso without the thruster assemblies, but the intakes still intact, and the pelvis removed.
More steps to come in part 2.

Tuesday, May 5, 2015

XV86 Response Suit

One of my projects I am working on is a book of custom Tau Battlesuits. I wanted to create an open guide for building your own battlesuits and providing more customization options for existing battlesuits. I love this aspect of the Tau the most so the following project was a pleasure.

The signature suit of the empire, the XV8 Crisis Suit, is already the mainstay of several armies, so why not make variations of it? There are already naming guides for the different loadouts, but I have an experimental variant I am especially proud of.
The XV86 Response Team is meant to be a fast attack suit that accompanies Forgeworld's XV9. That dataslate is one of the pages from my book. A few parts are covered in the book, like the Hardpoints system and things like the Special Drones list.
I won't get too much into the rules of the XV86, but more about the conversion and the models themselves. Of course these can be used as count-as XV8's because they hold the same base size and relative shape.
The XV86 conversion sports an enhanced thruster look. This could be used to represent Vectored Retro-thrusters. I wanted a speedier looking XV8 that fits its fluff.
Each model I made has a different stage for the advanced thruster assembly. I imagine these things being in constant motion to enhance the suit's speed and maneuverability.

In the next few posts, I will do a 'How I did it' guide on the conversion.

Thursday, April 16, 2015

Cities of Death - Updated!

Coming in the summer, I plan on running a 40k campaign. This being a continuation of a kill-team campaign I ran a little over a year ago. I will be posting here the chronicles of this coming campaign and details of how I am doing it.

First off I am presenting my own little simplified rules expansion for Cities of Death. Our campaign is map-based using the planetary empires tiles.. When a battle is fought over a tile, and that tile has a city/ruins feature, the players are to use the cities of death rules. The old cities of death book is sorely outdated (being made clear back in 5th edition - I think) and can be complex. So these are my simplified rules.

Keep in mind this document is made in the context of a campaign, so there are a few odd elements added in there, and for the same of simplification, some things are removed.


I am open to feedback and critique and willing to answer questions about it. Feel free to comment below or email me directly.

Monday, April 6, 2015

Grand Inquisitorial Retinue - Acolytes (The Penitent)

Now for the models that will be the most numerous in my army. I already talked about the acolytes in this post. These guys are more of them, but with flak armour instead of carapace. I call them The Penitent.

Their story is they are wash outs or drop outs of the Schola Progenium. Those that couldn't make the cut and become real Tempestus Scions. They are now seeking a second chance. They find it under the Inquisition. While most inquisitors want the best of the best, they find a certain drive and determination from these individuals, and ideal for expendables. Many of these Penitent will do anything to redeem themselves, asking only a second chance.
The basis for these minis are warzone minis. Again, I have used this deal for a lot of my conversions in this army, and it is one hell of a deal.
First off are the assault troopers. 4 pts for an acolyte in flak armour, chainsword, and las pistol. These are the cheapest models in my entire army. They provide ablative wounds and plenty of attacks. This unit will be supported with an inquisitor to provide stubborn, and a ministorum priests to make them absolute beasts in combat.
These are the bolt troopers. 5 pts for an acolyte with boltgun, las pistol, and flak armour. They are distributed throughout various units. One is acting as a sergeant for a squad, with the upturned hat and melta bomb. My goal is every unit in this army will have at least one melta bomb. Each and every single acolyte is capable of taking a melta bomb, but that would be overkill.
Sticking with the plasma spam theme of my army, these are the same acolytes, but I give them all plasma guns and carapace armour for added survivability for when they inevitably injure themselves from overheating.18 pts each.
A couple odd ones in the mix, mostly to even out points. These guys are carrying storm bolters. 7 pts for an acolyte with storm bolter, flak armour, and las pistol.